SummaryMy dad retrieved the copies of the building plans that we have from the basement and put a makeshift table in my room so we could start working. I spent the first night just trying to get myself acclimated to Revit by playing with it and doing research. Then the actual work began and we started with the basement first. Laying the foundation, making the walls, adding beams, etc. We stuck to the dimensions given by the plans closely. Since we only had the use of the basics for Revit, we didn't have all of the functions that my dad has available at his work so we had to try to work around that by making our own materials for certain items. We worked our way up following the basement, starting with the walls each floor, and then adding in the rest. Beam structures were added for each floor before the floors were placed and some beams had to be placed manually. The first and second floors were much easier than tthe basement as I was familiar with the software and its quirks by then and they required less work. Stairs were awkward as they didn't really allow us to create our own dimensions for their width. We could not figure out how to add the vinyl sidings on the exterior walls and after some research, I created a design myself based on a guide online. Following all of that, an auto-generated roof was added to see how the house was coming together.
|
|
Finishing Touches
We had to import truss families for the roof and I had to experiment with how to edit them to get them to look like the building plans had them. I did this on my own and when my dad was able to work with me after that, he saw that I had put trusses where they weren't supposed to be. We have a vaulted roof in our living room so I-joists are supposed to be used there but that didn't click in my head. After fixing that, The roof was trial and error with it having to be added manually in multiple sections. The walls were brought up to meet the roof and make that seamless and finishing touches were added. A garage door design was found and added to complete the house. The interior of the house is mostly unfinished as I could've dragged this project on for a long time messing with the interior but that wasn't the focus of this project.
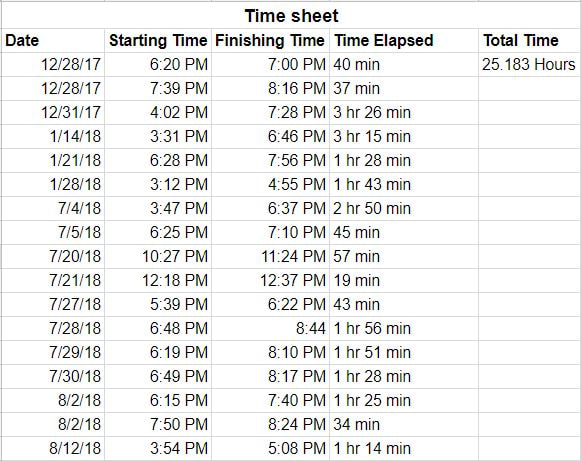
Timeline of events |
|
|
12/28/17- We began the project by retrieving the plans of the house and my dad gave me a brief overview of Revit
12/31/17- We began using Revit to create the basement of our house 1/14/18- We began working on the first floor 1/21/18- We finished up the first floor with windows and doors and began laying out the second floor 1/28/18- The stairs were added after much trial and error with their size and placement. The beams for the second floor were added 7/4/18-The second floor was finished and we researched how to add a profile for the vinyl siding on the exterior walls 7/5/18- We had to make our own profile so I made a design for the vinyl siding and added it to the exterior walls. We added an automatically generated roof as a placeholder for now to see how the house was coming together 7/9/18- The first trusses were placed for part of the roof (apparently undocumented in the time log) 7/20/18- The rest of the trusses were added 7/21/18- A quick attempt at adjusting the trusses 7/27/18- The trusses were adjusted to the correct dimensions 7/28/18- Experimentation with adding the roof 7/29/18- Most of the roof was added as well as (unsuccessful) attempts at making it seamless 7/30/18- The rest of the roof was added and all of it was adjusted to make it look as best as I could with the seams 8/2/18- FInal touches were added such as bringing the walls up to the roof, a garage was added, as well as the column at the front door 8/12/18- I fixed the vaulted roof by replacing the trusses with I-joists (misinterpretation of the plans pointed out by my dad). We also looked up ways to imbed the dwf file of the house in the website |